Showing posts with label Main Dishes. Show all posts

Thursday, April 29, 2010

Frito Chicken and Bean Casserole

Last week when I was meal planning, I had the random desire to make some sort of cheesy casserole with taco seasoning but couldn't find just the right recipe when I tried searching online. So, I decided that since I had a general idea of what I wanted, then I should try make something up. So voila, this is my creation! I must say, this absolutely came out every bit as good as I hoped it would, and is definitely something I plan to make again. Probably frequently. I love how a good casserole is easy to make, satisfying to eat, and less expensive than serving meat by itself (like in this recipe, I only used two large chicken breast halves and the casserole fed us for two days).


Frito Chicken and Bean Casserole

1-1/2 cups crushed corn chips, divided
1/2 cup sour cream
1/2 cup salsa
1/8 cup milk
1 can cream of chicken soup
1 tablespoon taco seasoning
2 cups shredded chicken (fully cooked)
1-1/2 cups or 1 can beans (such as kidney or black), drained
2 cups shredded Cheddar cheese
1/2 cup onion, chopped

Lightly spray or grease a 2-1/2 quart baking dish. Line the bottom of the pan with 3/4 cup finely crushed corn chips and set pan aside.

In a large bowl, stir or whisk together the sour cream, salsa, milk, soup, and taco seasoning until smooth. Stir in the chicken, beans, cheese, and onion. Gently drop by spoonfuls over the crushed chips in the pan, being careful not to displace the chips. Top with the remaining 3/4 cup of crushed chips. Bake at 375° for 35-40 minutes or until bubbly. Yields 6 to 8 servings.

Sunday, April 25, 2010

Three Cheese Vegetable Lasagna

It's no secret that I love lasagna and I was very happy to not be disappointed in this one. It's definitely a unique twist on an old favorite and tastes like something from an upscale restaurant. The sauce is homemade, which helps keep the cost down for this dish, and the sauteed vegetables impart some nice, healthy substance. Roughly estimating, it cost less than $8.50 to prepare this and lasted us three days for an average of less than $3 a meal.

This was my second time using an Aaron McCargo Jr. recipe (the first was Black Bean Burgers) and I found that once again, I had to tone down some of his seasonings (black pepper, red pepper, and smoked paprika). That man seriously loves wild flavor! I thought that my husband and I had pretty adventurous taste buds, but there's no way we could have handled using the full amount of spices that Aaron calls for. Even with my modifications, the lasagna still had quite the kick so anyone who does not like really spicy flavor may want to reduce at least the black pepper and red pepper even further (and remember, the measurements listed below already reflect my reduced amounts). My 2 1/2 year old asked for seconds on all three nights that we ate this, though I've come to the realization that he has a very abnormal palate for a child.


Three Cheese Vegetable Lasagna

12 to 15 lasagna noodles
2 to 3 tablespoons olive oil
1-1/2 cups broccoli florets
1-1/2 cups cauliflower
1 cup seeded and chopped zucchini
1 cup seeded and chopped squash
Kosher salt and black pepper to taste
1 medium onion, diced
4 tablespoons butter, divided
1-1/2 teaspoons smoked paprika, divided
1/2 cup grated Parmesan, divided
4 tablespoons all-purpose flour
1 tablespoon minced garlic
1 teaspoon freshly cracked black pepper
2 1/2 cups milk
1 cup vegetable or chicken broth
2 cups cottage cheese
2 cups shredded mozzarella cheese
1/2 teaspoon crushed red pepper flakes
4 tablespoons panko bread crumbs

Fill a large bowl or baking dish with hot water and soak the lasagna noodles for about 15 minutes, or until slightly pliable. Drain the water and set the noodles aside.

Meanwhile, place the oil in a large skillet or pan over medium-high heat. Add the broccoli, cauliflower, squash, and zucchini. Sprinkle with a pinch of salt and black pepper. Continue cooking, while stirring occasionally, for about 15 minutes or until vegetables are tender.

While the vegetables are still cooking, use another stove burner to begin the sauce. Place 2 tablespoons of butter and the onions in a large saucepan and saute over medium-high heat until translucent. Whisk in 1 teaspoon of black pepper, 1 teaspoon of paprika, the flour, and garlic. Stir in the milk and broth and season to taste with salt. Bring mixture to a boil and then reduce heat to simmer for a few minutes, while still whisking. Stir in 1/4 cup of Parmesan cheese and remove from heat.

Melt the remaining 2 tablespoons of butter and then combine with the remaining 1/4 cup of Parmesan cheese, the remaining 1/2 teaspoon of smoked paprika, and the red pepper flakes. Add the bread crumbs and mix well.

Ladle some sauce (about 3/4 cup) into the bottom of a greased 9 x 13 baking dish. (You may want to then pour the remaining sauce into a large measuring cup to help determine how to evenly divide the sauce for each layer.) Add a layer of noodles*, followed by half the cottage cheese mixture, half the vegetables, and one-third of the remaining sauce. Repeat this layer once and then finish with a final layer of noodles and the rest of the sauce. Sprinkle with the bread crumb mixture. Cover the lasagna with foil and bake at 350° for 20 minutes. Remove the foil and return to oven to bake for an additional 10 to 15 minutes. Allow the lasagna to rest at least 10 minutes before cutting and serving. Yields 9 servings.

*Keep in mind that the lasagna noodles will expand during cooking, so it is not necessary to completely cover the pan bottom (and subsequent layers) with the noodles. However, you can it you want to...you would end up needing all 15 noodles. I used only 12 noodles and evenly spaced them to allow for expansion.

Recipe adapted from Aaron McCargo Jr.

Sunday, April 18, 2010

Tortellini Salad

This yummy salad is my great-grandma's recipe and one of my childhood favorites. It looks pretty and with only three ingredients, it's a snap to make. I like to eat it as a main dish during the summer - the cold tortellini makes a perfect refreshing meal - but it's also a great side dish. My mom likes to serve it at cookouts, graduation parties, and other gatherings where it's always a big hit.


Tortellini Salad

1 (16- to 20-ounce) bag frozen cheese tortellini
2 small jars marinated artichoke hearts, undrained
2 small cans sliced olive

Cook tortellini according to package directions. Drain and place in a large bowl. Meanwhile, chop the artichokes into bite sized pieces, making sure to reserve the marinade. Pour the marinade over the tortellini and stir in that artichokes and olives. Chill for at least 1 hour before serving. Yields 4 meal-sized servings.

Tuesday, April 13, 2010

Sausage and Mushroom Quiche

Last week I was craving breakfast sausage, so decided to throw together this quiche using my mom's quick quiche recipe as a base. I hardly ever make the same quiche twice since quiche is so adaptable that its my go-to meal when I need to use up ingredients, so it tends to turn out differently each time. That's the beauty of this dish - you can change the filling ingredients (even altering amounts, within reason) based on your preferences and what you have on hand without worrying about having to adjust the egg mixture. This filling combination makes a savory breakfast dish which also works well as breakfast-for-dinner (which is how we ate it). And to make it healthier, I used turkey breakfast sausage instead of regular pork sausage. For the veggies, since we don't like our veggies too soft, I threw everything in raw but if you prefer very soft veggies, you could always soften them first in a pan with a little butter.


Susage and Mushroom Quiche

1 box (10 links) breakfast sausage
1 cup shredded sharp Cheddar cheese
1/8 cup onion, chopped
3 scallions, thinly sliced (white and green parts)
3/4 cup sliced fresh mushrooms
4 eggs
1/2 cup baking mix (such as Bisquick)
1-1/2 cups milk
1/2 teaspoon salt
1/4 teaspoon black pepper
1/4 teaspoon garlic powder

Brown the sausage according to the package directions, then place on a plate and allow to cool. When it's comfortable to handle the links, cut them into small pieces and place them in a small bowl. Add the onion, scallions, mushrooms, and cheese and toss gently to combine. In a separate bowl, beat the eggs, baking mix, milk, salt, pepper, and garlic powder. Evenly distribute the filling ingredients in the bottom of buttered 9-inch pie pan. Pour the egg mixture on top. Bake at 350° for 30-40 minutes or until cooked all the way through. Yields 4 servings (8 slices).

Tuesday, April 6, 2010

Gone All Day Stew

I first had this stew when my mother-in-law made it. I'll be honest, I'm not a big meat and vegetables fan unless there's also cheese involved, but I really enjoy this stew especially if served with cornbread. It's so tasty and comforting, perfect for cool weather (or if you're like me, any time of the year).

The first time I tried making this I followed the original recipe's instructions to cook the stew in the oven, but since I don't own a roasting pan or oven-safe pot, I had to borrow one from my mother-in-law. Then the next time I made it (last week), I forgot all about needing an oven-safe pan until the last minute, so out of necessity I turned this into a slow cooker recipe. I think I prefer the oven method, but that's probably because my slow cooker is an overachiever and doesn't cook as slowly as it's supposed to, resulting in overcooked food.

Unfortunately, I completely forgot about taking a picture of the stew. That's how distractingly good it was!

Gone All Day Stew

2 pounds beef, cut into 1 to 2 inch cubes
4 to 5 medium carrots, peeled and cut in 1 inch diagonal slices
4 to 5 medium potatoes, peeled and cut in 1 1/2 inch chunks
3 to 4 small onions, cut into large chunks or 1 inch wide strips
8 ounces fresh white mushrooms
2 beef bouillon cubes
1 can (10.75 ounce) condensed tomato soup
1/4 cup all-purpose flour
1 cup water
1 1/2 teaspoon Italian herb seasoning
1 1/2 teaspoon salt
1 bay leaf
1/8 teaspoon black pepper

Place beef, vegetables, and bouillon cubes in a large roasting pan or oven-safe pot with lid. In a medium bowl, combine soup and flour until smooth. Add seasoning and water; stir until well combined. Pour mixture over meat/veggies in pan. Cover and bake at 275° degrees for 4 to 5 hours. Remove bay leaf before serving. Yields 6 to 8servings.

Slow cooker version: Reduce the water to 1/2 cup instead of 1 cup. Cook on low setting for 8 to 10 hours.

Tuesday, March 30, 2010

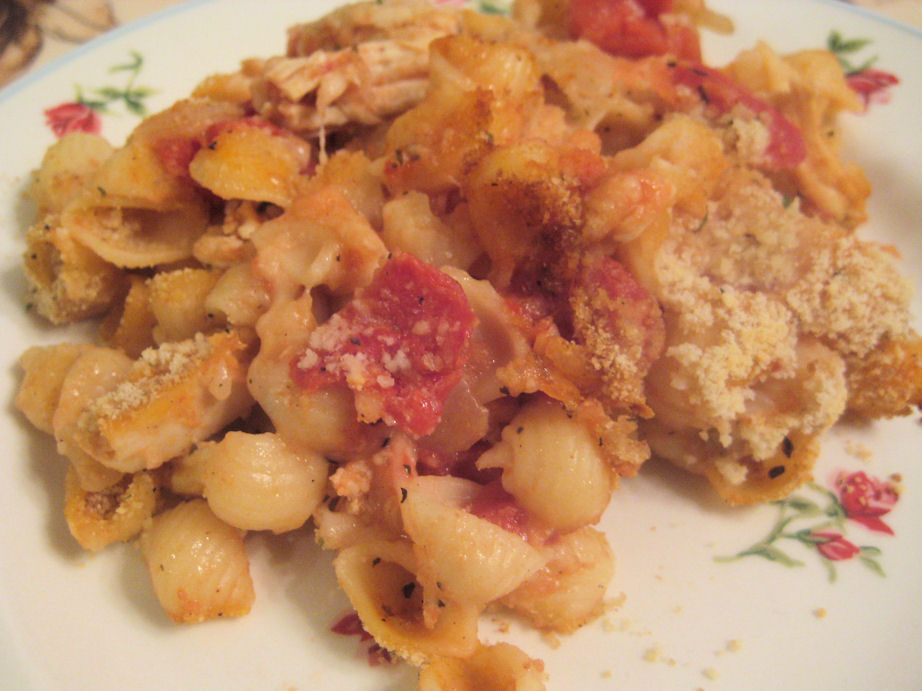
Italian Baked Chicken and Shells

This casserole is easy to prepare and tastes delicious. I've tried it with a few different cuts of pasta and liked the small shells better than larger ones like rotini or penne. The butter on top tastes delicious but sometimes I get lazy and leave it off (while reminding myself how many calories are saved by skipping it). This also freezes well, but skip the bread crumbs and Parmesan cheese and then add them later once thawed and ready to bake.


Italian Baked Chicken and Shells

2 1/4 cups small shells
2 tablespoons olive oil
1 cup onion, diced
3 cloves garlic, crushed
2 cups cooked chicken, cut into bite-sized pieces
1/2 teaspoon dry basil
2 cans (14.5 ounces each) diced tomatoes, undrained
2 cups shredded mozzarella or Italian blend cheese
1/2 teaspoon salt
1/2 teaspoon black pepper
1/3 cup bread crumbs
1/3 cup grated Parmesan cheese
2 tablespoons butter (optional)

In a large pot, boil the shells according to package directions. Meanwhile, in a large skillet, saute oil, onion and garlic over medium heat until tender, about 10 minutes. Add the chicken and basil and saute a few minutes longer, stirring frequently to prevent the chicken from sticking.

When pasta is done cooking, drain and return to pot. Stir in the onion/chicken mixture, diced tomatoes with liquid, shredded cheese, salt, and pepper. Place in a greased 9 x 13 baking dish and sprinkle with bread crumbs and Parmesan cheese. Dot with butter (if using) and bake at 400° for 30 minutes or until bubbly. Yields 6 to 8 servings.

Recipe adapted from Giada De Laurentiis.

Sunday, March 28, 2010

Black Bean Lasagna

I'm finally getting around to putting up my first recipe from this week, now that the week is over! I guess I got a little bit behind. Anyway, this lasagna was pretty good but not amazing. I think that the Fiesta Lasagna that I made last month was definitely tastier, but this Black Bean Lasagna still has a few things going for it (such as being meatless and less expensive) so I plan to make it again. I had to make several additions and adjustments to the spices in this recipe to kick up the flavor and realized too late that the 2 cans of tomato paste called for was a bit excessive, making the sauce too thick and tomato-y. Next time I'll make it with only one can of paste plus a can of tomato sauce, but since I haven't actually tried that yet I can't guarantee that it will be an improvement (though I'm 99% sure that it will be). I also think this would taste better with cottage cheese instead of ricotta, so will try it like that next time.


Black Bean Lasagna

9 lasagna noodles
1 cup onion, chopped
3 cloves garlic, crushed
1 teaspoon oil
2 cans black beans, rinsed and drained
1 can (14-1/2 ounces) diced tomatoes, undrained
2 cans (6 ounces each) tomato paste or 1 can paste plus 1 can (8 ounces) tomato sauce
1 to 1-1/2 cups water
2 tablespoons fresh cilantro, minced
1/2 teaspoon red pepper flakes
1/2 teaspoon salt
1/2 teaspoon cumin
1/2 teaspoon chili powder
2 eggs, lightly beaten
1 carton (15 ounces) ricotta or cottage cheese
1/2 cup grated Parmesan cheese
1 1/2 teaspoons dry parsley flakes
2 cups shredded Mexican cheese blend, divided

Cook the noodles according to the package directions. Drain, separate noodles, and set aside. Meanwhile, in a large skillet over medium heat, cook the onion and garlic in oil tender. Stir in the beans, tomaotes, tomato paste, water, cilantro, pepper, salt, cumin, and chili powder. Bring to a boil then reduce heat and simmer, uncovered, for 15 minutes. Add extra water if necessary to thin out sauce.

In a small bowl, mix together eggs, ricotta or cottage cheese, Parmesan Cheese, parsley, and 1-1/3 cups of shredded cheese. Grease or spray a 13 x 9 baking dish. Spread 1/2 cup of bean sauce mixture into the bottom of pan. Layer with three noodles, half of the cheese mixture, and a third of the remaining bean sauce mixture. Repeat layer once then top with remaining three noodles and the remaining bean sauce mixture. Cover and bake at 350° for 30 minutes. Uncover and sprinkle with remaining 2/3 cup shredded cheese. Bake for 10-15 minutes longer or until bubbly. Let sit for at least 10 minutes before cutting. Yields about 9 servings.

Recipe adapted from Healthy Cooking October/November 2008.

Tuesday, March 23, 2010

Garlic-Lemon Cheesy Chicken 'n' Rice

The name is a bit of a mouthful, but at least it's easy to guess all of the main ingredients from the title. My inspiration for this casserole was a breaded, stuffed chicken recipe that I loved. The combination of sharp cheddar and cream cheese with a tangy garlic-lemon butter was amazing! What I was less crazy about was stuffing and breading the raw chicken, so I decided to simplify the concept into a casserole. I was quite pleased with the result: it takes less time to prepare while still capturing the same wonderful flavors of the original recipe.

Garlic-Lemon Cheesy Chicken 'n' Rice

1 pound boneless, skinless chicken breasts
1-1/2 tablespoons butter
1 large clove garlic, crushed
1/2 teaspoon onion powder
1/4 teaspoon salt
1/8 teaspoon black pepper
4 ounces cream cheese
1 cup shredded sharp Cheddar cheese
1/4 cup milk
2 cups cooked brown or white rice
1/2 cup seasoned bread crumbs
2 tablespoons grated Parmesan cheese
2 tablespoons butter, melted
2-1/2 teaspoons lemon juice
1 large clove garlic, crushed

Cut the chicken breasts into chunks, a little larger than bite-sized. In a large skillet, melt the butter over medium heat and add the chicken breasts, 1 clove garlic, onion powder, salt, and pepper. Cook, stirring often, just until the chicken is fully cooked. Reduce heat to medium-low and add the cream cheese; stir until fully melted and smooth. Add the milk and mix until incorporated with the cream cheese. Gently stir in the Cheddar cheese and rice. Place this chicken/rice mixture into a greased 2-quart baking dish. Combine the bread crumbs and Parmesan cheese and evenly sprinkle over the chicken/rice. Combine the butter, lemon juice, and 1 clove garlic. Carefully drizzle on top of the bread crumbs. Bake at 350 until the edges begin to bubble, about 30 minutes.

Recipe inspired by All Recipes.

Sunday, March 14, 2010

Alpine Chicken Casserole

This is one of my all-time favorite recipes. My mom started making it when I was a small child and I've loved it ever since. Unlike many casseroles, this one calls for cubed cheese instead of shredded. I just love how the cubes get all melty and taste so warm and delicious when you bite into them!

When I made this the other day, I discovered that the recipe wasn't kidding when it specified real mayonnaise. I was out of mayo and used Miracle Whip instead... and it still tasted good but did not taste as amazing as it usually does. I've also discovered that I definitely prefer the taste of Cheddar cheese over Swiss cheese in this particular recipe, even though I'm a huge fan of Swiss in general. Plus the Cheddar gives the dish some nice color variation. The almonds are optional; they aren't something my mom ever included and I only tried adding them once. I felt they didn't enhance the dish enough to justify the added expense, so now I just skip them.

Oh, and a note about the stuffing: if you're using a box mix like Stovetop, use the entire 3 ounce packet. The box indicates that a 3 ounce packet makes 3 cups of stuffing, but mine always measures out at around 2 cups. I guess I don't fluff it enough. But at any rate, it works out fine in the recipe and then you don't have to worry about using only 2/3 of the packet and adjusting the other stuffing ingredients.


Alpine Chicken Casserole

2 cups cooked chicken, in bite-sized pieces
2 cups prepared stuffing mix
1 cup Cheddar or Swiss cheese, cut into small cubes
1 cup real mayonnaise
1/4 cup onion, chopped
1/4 cup milk
Slivered almonds (optional)

Combine all ingredients except almonds. Place in an ungreased 1 1/2 to 2 quart baking dish. Top with slivered almonds if desired. Bake, uncovered, at 350° for about 30 minutes or until edges begin to brown.

Friday, March 12, 2010

Black Bean Burgers

I first had black bean burgers several years ago when I nannied in a Kosher household (read: no mixing meat with dairy). Since I usually dislike meat without cheese, but plain cheese sandwiches get boring after all... eating frozen veggie cheeseburgers became a favorite lunch. Since then though, I hardly ever eat veggie burgers though I still think of them very fondly. So when I came across this Aaron McCargo recipe on Food Network, I absolutely wanted to try it. One thing that intrigued me was the smoked paprika in it. So I bought some and wow, does it smell good!! I'm definitely going to cooking with it in the future.

I made a few changes to the recipe, such as reducing the amount of black pepper (and it still had as strong pepper flavor). Another thing I did differently was use white flour instead of wheat, which was probably the reason why I had a tiny bit of difficult keeping the burgers together. So I recommend using the wheat flour if you have it, but if you don't, just be extra careful when flipping the burgers. To keep it inexpensive, instead of using canned beans, I used a pound of dry beans (I doubled the recipe). Unfortunately, my beans didn't yield what all the websites I googled promised: namely that a pound of dry beans was the equivalent of 6 cups (which equals 4 cans) of beans. I'm guessing that I didn't cook them long enough, although they were definitely soft enough to mash. Because I only got about 4 1/2 cups, I raided my pantry and found a can of light red kidney beans to add. (That's the bits of red you might notice in the burgers.)

So anyway, the burgers turned out wonderfully and had so much flavor that I decided they didn't need to be turned into cheeseburgers. And coming from me, that's saying something because I pretty much add cheese to everything. Be warned though, these burgers are pretty spicy. After all, this recipe did come from the show Big Daddy's House which specializes in "big, bold flavors"! My 2 1/2 year old loved them though (he even asked request "burggus" for breakfast the next morning), so I dare you to try them. :)


Black Bean Burgers

3 cup cooked black beans or 2 cans, drained
1/2 cup onion, finely chopped
1 teaspoon red pepper flakes
1 teaspoon smoked paprika
1 teaspoon Worcestershire sauce
1 teaspoon hot sauce
1 to 1-1/2 teaspoons fresh cilantro, chopped
3 tablespoons whole-wheat flour
1/2 tablespoon Kosher salt
1-1/2 teaspoons black pepper
1 egg white, slightly beaten
3 tablespoons oil
Burger buns

Thoroughly mash the beans in a large bowl. Add the remaining ingredients except oil and mix thoroughly with hands or a sturdy spoon. Form into burger patties. Heat oil in a saucepan over medium-high heat. Gently add the burgers, reforming the patties if necessary. Cook the burgers for until crispy, about 3 to 4 minutes, and then carefully flip over and cook an additional 3 to 4 minutes. Remove the burgers and place on a plate lined with paper towels to absorb excess oil. Serve on buns with desired toppings (we used spinach and tomatoes). Yields 4 large or 6 medium burgers.

Recipe adapted from Aaron McCargo Jr.

Wednesday, March 10, 2010

Cider Vinegar Pork Roast

My mother-in-law got this tangy roast recipe out of Reader's Digest. Even though I'm really not a huge fan of pork or peppers, I just love this unique combination of flavors. The original recipe called for a boneless loin roast, but my mother-in-law has used bone-in roast and I used a boneless pork butt, a less expensive cut than loin. One thing that surprised me about this original instructions was that they didn't mention browning the roast first. I thought about browning the meat anyway, but figured I might as well save time and see what happened if I didn't. Well I thought this turned out just as well as other roasts I've made that I did brown first, but perhaps it could have been even better had I browned it? Who knows. The gravy is my favorite part, but when I attempted to strain off the fat, the seasonings were getting strained out too. So I gave up on that and the first night I made only 1 cup of (fatty but delicious) gravy and then refrigerated the remaining cooking juices. The next day, I just used a spoon to scoop all the congealed fat off the top and made more gravy. The gravy tastes awesome served over mashed potatoes, egg noodles, or rice.


Cider Vinegar Pork Roast

1 pork roast (3 to 4 pounds)
2 cups chicken broth
1 sweet red pepper, cut into narrow strips
1/2 cup onion, chopped
1/4 cup cider vinegar
2 tablespoons Worcestershire sauce
1 tablespoon brown sugar
2 teaspoons Italian seasoning
1 teaspoon salt
1 teaspoon black pepper
4 teaspoons cornstarch
4 teaspoons water

Cut the roast in half and place in the bottom of a slow cooker. Combine broth, red pepper, onion, vinegar, Worcestershire sauce, sugar, Italian seasoning, salt, and pepper; pour over roast. Cover and cook on low setting for about 3 to 4 hours or until thermometer inserted in center reads 160. With a slotted spoon, remove the red pepper and onion and set aside.

To make gravy, skim the fat off the cooking juices and measure out two cups. In a saucepan, stir cornstarch and water together until smooth; add measured cooking juices. Bring to a boil then reduce heat and simmer for 3 to 5 minutes or until thickened. Serve roast with red pepper, onion, and gravy. Yields about 6 to 8 servings.

Recipe from Reader's Digest March 2009.

Thursday, March 4, 2010

Mushroom Swiss Noodle Bake

I created this recipe a year ago to satisfy a pregnancy craving. It was inspired by a similar dish I made once several years ago. I enjoyed it then but for some reason did not save the recipe. I think my recreation tastes even better, but it's possible that I'm a tiny bit biased. :) It's so indulgently creamy and cheesy! To save time and money, you can eliminate the fresh mushrooms by using two cans of cream of mushroom soup instead of the chicken (or use one of each). But if you're like me, you won't want to do that because fresh mushrooms are so incredible that they're worth the 45 seconds each it takes to wash them. (Seriously, it takes me about 10 minutes to clean an 8 ounce package, but I'm a little obsessed with getting every speck of dirt washed away).

I couldn't find my camera the day I made this (and I don't like taking pictures of leftovers, it never looks the same after it's sat in the fridge, you know?). This photo was taken with a cell phone which surprisingly took a pretty clear picture, but gave it a yellowish cast. I edited the coloring as best I could, but it still doesn't look quite natural. Oh well.


Mushroom Swiss Noodle Bake

1 lb. boneless, skinless chicken breasts (about 3 breast halves)
10 oz. uncooked medium egg noodles (about 5 cups dry)
1 1/2 Tbsp. butter
1/3 c. onion, finely chopped
8 oz. fresh mushrooms, washed, halved, and sliced
1/2 tsp. garlic powder
1/4 tsp. salt
1/4 tsp. pepper
2 cans cream of chicken soup
1 c. sour cream
2 c. Swiss cheese, shredded

In a large pot, boil the chicken until fully cooked. Remove chicken from pot (do not discard the water) and cut into bite-sized pieces. In a skillet, melt the butter over medium-low heat and saute the onion, mushrooms, garlic, salt, and pepper until tender, about 10-12 minutes. Meanwhile, in the same water used to cook chicken, boil the egg noodles and cook according to package directions. Drain and return to pot. Stir in soups, sour cream, and cheese and stir gently until well combined. Stir in the chicken and mushroom/onion mixture. Bake in a greased 9x13 dish at 350 degrees for about 30 minutes. Yields about 6 servings.

Sunday, February 28, 2010

Fiesta Lasagna

I've made a Mexican-type lasagna before, but it really wasn't anything like traditional lasagna. It was made with flour tortillas instead of noodles, no cottage cheese, and taco sauce out of a jar. So when I came across this Mexican-style lasagna that still used many traditional ingredients, I was very intrigued. The recipe needed some tweaking - for example I reduced the amount of shredded cheese to make it more cost effective - but the end result was fantastic. Afterward I added up the cost and was surprised that it cost me a little over $10 to make. I usually cook for much less but then I realized that since we could get three meals out of it (but didn't since we had company the first night we ate it!), it's still pretty budget friendly at less than $3.50 a night. And it was so, so good that I can't wait to make it again!

(Sorry, no picture... I didn't wait the full 20 minutes to cut into it and it fell apart on our plates. It didn't look very appetizing like that, even though it definitely was.)

Fiesta Lasagna

1 lb. ground beef or turkey
1/4 c. onion, chopped
1 can (16 oz.) refried beans
1 can (15-1/2 oz.) mild chili beans, undrained
1 can (14-1/2 oz.) Mexican stewed tomatoes, drained*
1 can (4 oz.) chopped green chilies*
1 c. salsa
1 pkg. taco seasoning
1 tsp. oregano flakes
1 tsp. ground cumin
1/4 tsp. garlic powder
2 c. shredded Cheddar or Mexican blend cheese, divided
1 1/2 c. small-curd cottage cheese
3/4 c. sour cream
9 lasagna noodles, cooked, drained and rinsed

*I was unable to find Mexican stewed tomatoes so instead used two cans (10 ounces each) of Ro-tel in placed of the can of stewed tomatoes and the can of green chilies. Tasted great!

In a skilled, cook meat and onion over medium heat until no longer pink; drain. Add the refried beans, chili beans, tomatoes, chilies, salsa, taco seasoning, oregano, cumin, and garlic. In a small bowl, combine the 1 cup of shredded cheese, cottage cheese, and sour cream.

Spread 1 cup of meat sauce into the bottom of a greased 9x13 baking dish. Layer with three noodles, half of the cheese mixture, and one-third of the remaining meat sauce mixture (about 2 1/2 cups). Repeat layer, then top with remaining three noodles and remaining meat sauce. Cover and place in oven with a baking sheet underneath dish to catch any sauce that may bubble over. Bake at 350° for 1 hour. Uncover and sprinkle with remaining shredded cheese. Bake for 10 minutes longer or until cheese melted. Let stand for 20 minutes before serving. Yields: 9 servings.

Recipe adapted from Taste of Home December/January 2008 issue.

Monday, February 22, 2010

Potato Bacon Torte

I discovered Melissa d'Arabian, the most recent The Next Food Network Star winner, a few weeks ago. I wish I could watch her new show Ten Dollar Dinners all the time but alas, do not get the Food Network channel. But at least all of her recipes are listed on Food Network's site as well as some clips from her show. Melissa says that this particular recipe costs less than $4 to make, but several comments on the site seemed to doubt that it was really so cost effective. Even I initially looked at it and thought, Cream? Bacon? Cheese? Seriously?! But it looked so good that I had to give it a try. And although it was somewhat time consuming, it was well worth the effort and surprisingly economical.

Budget Breakdown: Melissa was correct in stating that this recipe can be made for under $4. I made one modification by using Swiss cheese instead of the Gruyere cheese called for in the original recipe, but I also tripled the amount from 1/4 to 3/4 cup of cheese. So I probably didn't actually save any money by using a less expensive cheese since I used so much more, but at least I got to use more! Anyway, here's how I calculated my cost. The double crust cost cost me $1 in butter and 25 cents in flour. I forgot to weigh it beforehand but estimate that I used about 1 1/2 pounds of potatoes from a $2.50 10-pound bag, making the cost of the potatoes 38 cents. I used one-third of a $1.99 package of bacon; so that was 67 cents. One-third of a 16 ounce carton of cream ($1.74 at Wal-Mart) was 58 cents. The 3 ounces of Swiss cheese ($3.19 for a 16 ounce block) costs 60 cents. Add 10 cents for the egg and in total, it was about $3.58 to make this!

Potato-Bacon Torte

3 sprigs fresh thyme or about 1/2 tsp. dried thyme flakes
2/3 c. heavy cream
2 prepared pie crusts
3-4 medium baking potatoes, peeled
4 strips bacon, cooked and crumbled
Salt and black pepper
3/4 cup Swiss or Gruyere cheese, shredded
1 egg yolk, whisked with a splash of water

In a small saucepan over medium-low heat, bring the cream and thyme just to a simmer. Turn off the heat and let steep for about 5 minutes. If using fresh thyme sprigs, remove after steeping.

Roll one pie crust into a 10-inch circle and press into the bottom and sides of a 9-inch pie dish. Cut the potatoes in half lengthwise and then thinly slice. Layer the sliced potatoes evenly into the bottom of the pie crust. Season each layer with salt, pepper, and about 1/4 of the crumbled bacon. Continue layering until the pie dish is filled or until the potatoes run out (you should get four layers). Sprinkle the cheese over the top of the final potato layer. Carefully pour the cream over the top of the cheese, allowing it to seep down the sides and between the potato slices.

Roll out the remaining pie crust. Lay over the top of the pie dish and press to seal the edges. Trim off excess dough. Brush the top and edges of the crush with the egg yolk. Make a few slits in the center of the top crust to allow steam to escape. Place the pie plate on a baking sheet and bake at 375° for about 50 to 60 minutes or until the crust is browned and crispy. (You may need to cover the edges of the pie crust to prevent them from overcooking.) Let the torte rest for about 15 minutes before cutting into slices.

Recipe adapted from Melissa d'Arabian.

Friday, February 19, 2010

Broccoli Chicken Casserole

I had constant "morning" (if only it had been confined to just one part of the day!) sickness during the first and second trimesters of my first pregnancy, to the point of being unable to cook meals or do much of anything. One night, a friend brought us this casserole to give Eddie a break from cooking. I have fond memories of this comforting dish since I even managed to eat it and like it. It's great served with some rice on the side... especially if you save the water you cooked the chicken in and use that to boil the rice.


Broccoli Chicken Casserole

2 c. frozen or fresh broccoli, chopped or cut into small spears
2 c. cooked chicken, cut into large bite-sized pieces
1 can cream of chicken soup
1/2 c. chicken broth
1/4 c. grated Parmesan cheese
1/4 c. seasoned bread crumbs

In a small bowl combine soup, broth, and cheese. Layer first broccoli and then chicken in an 8x8 or 11x7 baking dish. Pour soup mixture over broccoli and chicken. Top with bread crumbs and bake at 350° for 25-30 minutes or until bubbly. Yields 3-4 servings.

Wednesday, February 17, 2010

Children's Delight

I was introduced to this recipe after my daughter Liberty was born last summer and a friend brought me a meal. She did not mention the recipe's title but my mom, who was staying with us at the time, thought it tasted a lot like a dish she had made once, something called Husband's Delight. I barely remember having it then, but the reason she only made it once was that my brother and I absolutely hated it. So much so, in fact, that my brother dubbed it "Children's Horror"! Well, when my mom thought it was the same recipe, I thought that since I had disliked it as a child, then surely my friend's dish could not be the same thing. But sure enough when I asked for the recipe I learned that it had a similar title. I guess my taste buds have matured!

The original recipe calls for ground beef, but I like to use turkey sausage for extra flavor. I also cut the sour cream back from 16 ounces to 12 ounces so that it's not quite so rich (though it's still pretty rich1). For those who don't prefer a dominant sour cream flavor, try adding some plain canned tomato sauce to enhance the tomato element of the sauce.


Children's Delight

1 lb. rotini or penne
1 lb. ground beef (or meat of choice such as turkey sausage)
1/2 c. onion, chopped
1 clove garlic, minced
1 Tbsp. butter
1 can condensed tomato soup
12 oz. sour cream
1 Tbsp. milk
8 oz. shredded Cheddar cheese
1/4 tsp. black pepper
1/2 tsp. salt

In a large skillet, brown meat until no longer pink and drain. (If using cooked sausage, skip right to browning the sausage together with the onions/garlic.) Add the onion, garlic, and butter and saute until onions are tender, about 10-15 minutes. Meanwhile, cook pasta according to directions and drain. Return to pot and stir in soup, sour cream, milk, cheese, pepper, and salt until well combined. Add the meat/onion mixture and stir gently. Place in a 9x13 dish and bake at 350° for about 30 minutes. Yields 6-8 servings.

Friday, February 12, 2010

Penne in the Pink

This is the recipe we had earlier this week, but I made "Tortellini in the Pink" as an experiment. Although it tasted great, the tortellini-to-sauce ratio wasn't quite right. I used 20 ounces of tortellini which despite weighing more, makes up less mass than 16 ounces of plain pasta. So for that reason, I recommend trying this with regular pasta since that's how the recipe is supposed to be made. Also, be sure to read about the surprising alternate way to make it with a lot less fat, a trick I learned from the family who gave me the recipe several years ago. One thing though about making it this way is that the sauce will be less "pink" but that's just cosmetic. (The sauce pictured was made the alternate way.) Personally, I think the unhealthy version tastes best (of course), but my husband says that he likes the healthy one better and it's one of his all-time favorite meals.


Penne in the Pink

1 lb. penne
1/2 stick butter
3 c. prepared pasta sauce
1 c. heavy cream
3/4 to 1 c. grated Parmesan cheese
1 Tbsp. plus 1 tsp. dry basil or 1/4 c. fresh basil, chopped
salt and pepper to taste

In a large pot, cook pasta according to package directions. Drain and return to pot; add butter and stir gently until melted. Stir in pasta sauce and whipping cream until combined. Add cheese and basil. Heat on medium-low until cheese is melted and sauce is bubbly, stirring occassionally to prevent sticking. Serve immediately. Yields 6-8 servings.

Alternate Healthy Version: Substitute a can of white beans for the the whipping cream. Sounds bizarre? I know, but it really is pretty good. Simply place the undrained beans into a food processor or blender and puree until smooth. (For some extra flavor, throw a clove of garlic in before pureeing.) This is a bit thicker than cream, so doesn't exactly replicate the texture, but what do you save in calories and fat? First you save half the calories (about 400). And with 80 grams of fat in 1 cup of cream and only 3 grams of fat in a can of beans, almost all of the fat is eliminated.

Wednesday, January 20, 2010

Favorite Taco Meat

We had this for dinner this week, so I thought I'd share. It's not a from-scratch recipe, but much tastier than the typical from-a-seasoning-packet meat. I make it with ground turkey, but this could be made with any meat.

Favorite Taco Meat

2 lbs. ground meat
2 8 oz. cans tomato sauce
1 cup salsa
1 packet taco seasoning

In a large frying pan, brown meat until no longer pink. Drain grease and return to pan. Add remaining ingredients and simmer on low heat for several minutes to intensify flavors.

Note: I usually half this recipe since 2 pounds is too much for our little family. Sometimes I still use an entire packet of taco seasoning, which makes it pretty strong but still good. Or if I end up following the recipe and only using half a packet, I use some of the extra seasoning and some salsa to mix into cooked rice. It makes a quick and easy side dish!

Tuesday, December 29, 2009

Using Turkey Leftovers

For Christmas this year, we hosted dinner - it was our first experience cooking a holiday dinner as well as our first experience cooking a turkey. I like cooking to be somewhat challenging, so I wasn't content with just any old turkey (plus I don't really like turkey). It had to be an exceptional turkey! So, we made a Tyler Florence recipe... fresh sage and butter rubbed under the skin of a maple-roasted turkey shingled with smoked bacon on top and homemade sage cornbread stuffing inside. We totally misjudged the time and dinner ended up being later than planned but it turned out great. It was super moist, just the way I like it! But it was a 13.5 pound turkey served to just four adults and one toddler, so there was plenty of turkey left. After two days of leftovers, we had eaten all of the side dishes but still had quite a bit of turkey. So I decided to adapt a chicken salad recipe and make turkey salad for dinner last night. The cold, creamy salad made a nice change from eating hot turkey. (And I still had turkey left after making this, so the remaining turkey went into the freezer and I expect we'll do something like turkey club sandwiches with sometime, whenever we recover from turkey burn-out.)


Turkey Salad with Walnuts and Grapes

1/2 c. Miracle Whip
2 Tbsp. sour cream
1 Tbsp. lemon juice
1 tsp. honey
2 c. turkey, broken or shredded into bite-sized pieces
1 c. seedless green grapes, quartered or sliced
3 green onions, thinly sliced
1 rib celery, thinly sliced
1/2 c. walnut pieces

Combine the Miracle Whip, sour cream, lemon juice, and honey in a medium mixing bowl. Add turkey, grapes, onions, celery, and walnut pieces and stir gently until mixed in. Add more Miracle Whip if needed.

Note: I used a mix of dark and light meat, but it could be made any way you prefer.

Friday, November 20, 2009

Turkey Muffuletta

Ever had a muffuletta at a sandwich shop or other restaurant? It's a delicious, unique sandwich that is popular in New Orleans. A muffuletta is traditionally made with Italian meats like salami and ham. This recipe however uses turkey, a healthier meat choice. It tastes fabulous and is a favorite in our house.


Turkey Muffuletta

1 loaf (16 ounces) Italian bread

Dressing:
1/3 c. olive oil
3. Tbsp. balsamic vinegar
1 Tbsp. fresh minced basil or 1 tsp. dried basil
1 garlic clove, minced
1/2 tsp. salt
1/4 tsp. red pepper flakes

Filling:
3/4 lb. sliced deli turkey
6 oz. Swiss or provolone cheese, thinly sliced
1 jar (7 oz.) roasted sweet red peppers, drained and chopped
1/4 c. pimiento-stuffed green olives, chopped
1/4 c. black olives, chopped
1 large tomato, sliced
3 Tbsp. shredded Romano cheese
1 Tbsp. minced fresh oregano or 1 tsp. dried oregano
1/4 tsp. black pepper
Optional: chopped red onion

Cut bread in half lengthwise; carefully hollow out top and bottom, leaving a 1-inch shell (discard removed bread or save).* In a small bowl, combine oil, vinegar, basil, garlic, salt, and red pepper flakes. Brush over cut sides of bread. Combine chopped red peppers, green olives, and black olives. If using red onion (it adds some nice color and flavor), combine with the peppers and olive as well. In the bottom bread shell, layer turkey, cheese, pepper-olive mixture, and tomato. Sprinkle with Romano cheese, oregano, and black pepper. Replace bread top. Wrap in plastic wrap and refrigerate for 30 minutes. Cut into slices and serve.

Healthy tip: for a low-carb version, try omitting the bread and cutting the turkey and cheese in bite-sized pieces. Toss all filling ingredients with a green salad topped with the dressing. I haven't actually tried this (we love bread), but it can't be bad!

*A good use for the saved bread is homemade bread crumbs. The bread can be reduced to crumbs in a food processor and then toasted in a toaster oven or in the oven on a baking sheet at low heat. Whenever I've done this, I use the crumbs within a few days so I'm not sure how long these would last stored in a container (not having the preservatives that store-bought bread crumbs have). It would probably be best to freeze the bread or bread crumbs if they won't be used within a few days.

Recipe adapted from Taste of Home December/January 2008 issue.